
A dishwasher only works as well as its drainage system and at the center of that system is one simple but essential part: the dishwasher drain hose. This flexible tube carries dirty, soapy water out of the appliance and into your kitchen’s plumbing after every wash cycle. When it’s installed correctly, you barely think about it. When it’s kinked, clogged, or routed the wrong way, it can cause standing water, bad odors, and drainage failures. This guide walks through proper setup, common problems, and the maintenance habits that keep it working reliably for years. For the bigger picture of how the whole appliance works together, see our complete dishwasher guide.
What the Drain Hose Does
Every dishwasher cycle ends with a drain phase, where a pump pushes wastewater through the hose and out to your sink’s garbage disposal, a dedicated drain line, or an air gap fitting on your countertop. The dishwasher drain hose has to be the correct diameter, free of sharp bends, and positioned with the right amount of rise before it connects to your plumbing. Get any of these wrong, and drainage problems follow almost immediately.
Proper Setup and Routing
Correct installation starts with the routing path. Most manufacturers require the hose to loop upward and be secured at a high point under the counter before it drops onto the drain connection, which prevents dirty water from siphoning back into the dishwasher between cycles. The exact height for this loop varies by manufacturer and model, so always confirm the specific measurement in your installation manual rather than assuming a standard figure applies.
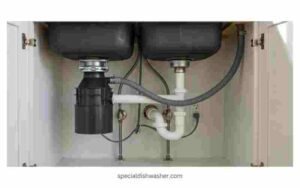
High Loop vs. Air Gap
A high loop and a physical air gap are not always interchangeable. Some local plumbing codes — California’s, for example — require a dedicated air gap fitting mounted on the countertop or sink deck, and a standard high loop alone will not satisfy that requirement even if your dishwasher’s manual treats it as an acceptable option. Check your local plumbing code before finalizing the installation, not just the manufacturer’s instructions.
Dishwasher Drain Hose Routing Checklist
If you’re working from a dishwasher drain hose routing diagram, confirm:
- The high loop or air gap requirement, and its required height for your specific model.
- Whether your local plumbing code requires a physical air gap rather than a high loop.
- The maximum allowable distance between the dishwasher and the disposal or drain connection — this also varies by manufacturer, so check the manual rather than rely on a general rule of thumb.
- Avoiding tight kinks, especially where the hose exits the dishwasher cabinet or passes behind the sink base.
- Securing the hose with a clamp at both the pump connection and the drain connection.
Brand-Specific Drain Hose Routing
Brand-specific routing does vary. A Frigidaire dishwasher drain hose routing diagram will typically show a rear-exit hose secured in a loop under the counter, while some Samsung dishwasher drain hose setups include a built-in check valve near the pump — though this feature is not universal across all Samsung models, so don’t assume it’s present without checking your unit’s documentation.
Always follow your specific installation manual rather than assuming all brands or models route identically.
Best Practices during Installation
- Remove the disposal knockout plug — every time, no exceptions. If you’re connecting the drain hose to a garbage disposal, there’s a small plastic plug inside the disposal’s inlet port that must be knocked out before hookup. Forgetting this single step is one of the most common reasons a brand-new dishwasher installation won’t drain at all, since the plug seals the port shut and leaves the hose with nowhere for water to go. Check the disposal’s included instructions for the exact knockout location, and shake out the disconnected piece so it doesn’t rattle around inside the disposal.
- Use the correct hose length for your setup. Don’t coil excess hose — extra length increases the chance of kinks and slows draining.
- Avoid low points (sags). Any dip in the hose can trap water and food debris, leading to clogs and odors over time.
- Secure connections tightly at both the disposal port and the dishwasher pump outlet, using new clamps if the old ones look worn.
- Check for a clean, straight run where possible — every unnecessary bend adds resistance to the pump.
- Test run empty after installation to confirm the dishwasher drains fully with no leaks at the connections.
When the Dishwasher Isn’t Draining
If your dishwasher is not draining, the hose is one of the first places to check, followed by the drain pump, filter, and air gap (if you have one). Common causes include:
- A clogged filter basket at the bottom of the tub.
- Food debris or grease trapped inside the hose itself.
- A kinked or pinched section of hose behind the unit.
- A clogged garbage disposal on the connected side.
How to Unclog a Dishwasher Drain
Learning how to unclog a dishwasher drain goes more smoothly as a short sequence of steps rather than trial by and error:
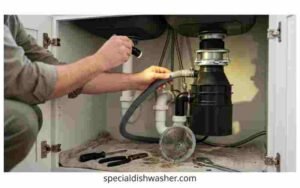
Cut power and water first
Turn off power to the dishwasher at the breaker (or unplug it if accessible) and shut off the water supply valve under the sink. Standing water inside the tub means the unit may still be live, and you don’t want the pump or float switch activating while your hands are inside it.
Remove and inspect the lower filter
This is where most debris collects, and it’s the most common cause of slow draining. For a full walkthrough of the removal and cleaning process, see this step-by-step filter cleaning guide.
Check the hose itself if the filter is clean
Disconnect the hose at the disposal end and inspect it for blockages.
Flush rather than force
Rather than pushing a wire hanger inside — which can scratch or puncture the interior wall and create a leak point later on — flush the hose with a steady stream of water from a hose or tap, and use a soft-bristle bottle brush for anything visible near the opening.
Escalate carefully if needed
If the clog doesn’t clear, a proper plumber’s snake sized for the hose diameter is a safer option than improvised tools, or replace the hose if it’s old and you suspect internal buildup.
Test the disposal
Running the disposal itself (if connected) can also clear a hidden clog that’s backing up into the dishwasher, but only with power restored afterward and your hands clear of the drain opening.
When to Replace a Dishwasher Drain Hose
Not every drainage issue is a cleaning problem — sometimes the hose itself has reached the end of its useful life. Consider replacing it if you notice:
- Visible cracking, brittleness, or discoloration along the hose length.
- Recurring clogs in the same section even after cleaning.
- Soft spots, bulging, or a hose that feels collapsed in places when empty.
- Persistent leaks at the clamp connections that tightening doesn’t fix.
- The hose is original to a dishwasher that’s more than 8–10 years old, since rubber and plastic hoses degrade with age regardless of visible damage,
Replacement hoses are inexpensive and widely available for most brands, and swapping one out is a fairly quick fix compared to diagnosing an intermittent leak or clog over and over.
Troubleshooting Beyond the Hose
Not every dishwasher problem traces back to the drain hose. If your dishwasher is not draining, it’s worth first ruling out the pump, filter, and disposal connection as described above. But some symptoms point elsewhere entirely:
- A Whirlpool dishwasher start button is not working, or a dishwasher won’t start issue generally, it is usually an electrical or door-latch problem rather than a drainage one.
- An LG dishwasher error code AE or a Bosch dishwasher E24 error code can relate to water sensors or drainage depending on the model, so check your model’s specific code chart before assuming the cause.
If hose and filter checks don’t resolve the issue, consult your model’s manual or a qualified appliance repair technician for further LG dishwasher repair or brand-specific diagnostics. This breakdown of DIY vs. professional dishwasher repair is a useful reference for deciding which route makes sense for your situation.
Cleaning and Maintenance
A well-installed dishwasher drain hose still needs regular attention, since grease, food particles, and hard water minerals build up over time.
How to Clean a Dishwasher with Vinegar
To clean a dishwasher with vinegar, place a dishwasher-safe cup filled with plain white vinegar on the top rack and run a hot, empty cycle. This helps dissolve grease, soap scum, and mineral deposits throughout the tub, spray arms, and drainage path. Frequency isn’t one-size-fits-all — follows your manufacturer’s cleaning guidance for how often to run this kind of cycle, since it can depend on your water hardness and usage.
One caveat worth knowing: while vinegar is effective, frequent use of high-concentration vinegar cycles can gradually degrade rubber gaskets, hose seals, and other rubber components in some units, since vinegar’s acidity breaks down rubber over repeated exposure. If your dishwasher is newer, or you clean it often, a commercial citric acid-based dishwasher cleaner is generally gentler on rubber parts while still handling mineral buildup and grease effectively.
Mold in the Dishwasher
Mold in dishwasher interiors, especially around the door gasket and lower filter, thrives in the damp, food-residue-rich environment inside the tub. Wiping down the gasket weekly and leaving the door cracked open after cycles to air dry both help prevent buildup.
What to Clean a Dishwasher With
If you’re wondering what to clean a dishwasher with, the short list includes white vinegar, baking soda, and dish soap for the exterior. For what to put in the dishwasher to clean it, a dishwasher-specific cleaning tablet works well, or vinegar and baking soda used are separately — never combined in the same cycle, since mixing an acid and a base neutralizes both and cancels out their cleaning effect.
Detergent Choice Matters
The detergent you use affects how much residue builds up in the hose and tub over time. Clean dishwasher pods and finished powder dishwasher detergent both work well, but hard water areas often do better with powder, since it dissolves gradually and leaves less film. If you notice dishes smell after dishwasher cycles, even when clean, switching detergent type, running a vinegar cycle, and double-checking the drain hose for trapped debris usually resolves it.
Frequently Asked Questions
How do I know if my dishwasher drain hose needs a high loop?
Almost all standard installations require one, but the exact height and method (a physical loop vs. an air gap) depend on your model and local plumbing code — check your installation manual to confirm.
Can I use any garden hose or tubing as a replacement drain hose?
No. Dishwasher drain hoses are made to handle hot water and specific pressure from the drain pump, and they connect with fittings sized for your model. Use a manufacturer-approved replacement hose.
Why does my dishwasher drain hose keep collecting standing water?
This usually means the loop or high point isn’t positioned correctly, or there’s a low spot (sag) somewhere in the run that’s trapping water. Recheck the routing against your installation diagram.
Is it normal for the drain hose to make noise during the drain cycle?
A brief whooshing or gurgling sound is normal as water and air move through the hose. Loud rattling, or a whining pump sound is more likely a pump or clog issue than the hose itself.
How often should I inspect my dishwasher drain hose?
A quick visual check every few months — looking for kinks, cracks, or looseness at the connections — is enough for most households, with a closer inspection any time you notice slow draining or odors.
Final Thoughts
Whether you’re installing a new unit, troubleshooting a Samsung dishwasher drain hose, or trying to figure out why your machine won’t drain, the fundamentals stay the same: correct routing per your model’s manual, a secure high loop, and regular cleaning. Check the filter often, follow your manufacturer’s guidance on cleaning frequency, and address those issues as they come up rather than waiting for a full drainage failure.
